Setting your type right is the most crucial fundamental of web and app design. So speed up your design process and get professionally looking results with my top seven Figma typography tips.
I’m using Figma for web & app design for a long time now. When I discovered it in 2018, typographic possibilities were quite limited, but this changed a lot in recent years! People are regularly surprised when I show it in my workshops. So it’s about time to share this more broadly on YouTube and in this article.
TL;DR: Discover Figma’s advanced typographic possibilities by utilizing the type settings. Use short cuts to select text faster, and truncate text to make your components more versatile. Learn how to apply relative line heights, and see new possibilities with OpenType features. Use variable fonts and seamlessly adjust the weights and styles of a typeface, and apply leading trim to prevent your layout from shifting when changing to a different font.
7. Selecting text faster in Figma
When you just want to select the text, it’s always super annoying 😖 to double-click your frames or groups. This is how you can speed up the whole process:
- Hold
commandon a Mac (or ctrl on Windows). - Directly click the text layer you want to select.
- If you want to pick several elements, do so by holding command + shift.
Now, what if you wanted to change the font for all the text on your canvas at once? And of course you did not create any styles for that (only boring people do that). Make this in a snap and:
- Click on the desired frame/s or group/s.
- Hitting the Enter key will select all elements that are nested inside it. If you hit it often enough, you will eventually end up at the deepest layers, which will be your text elements.
- Edit the font at the text panel.
Huge time saver, you’re welcome 😉.
6. Truncate text
You have a fixed height layout, like some cards in a blog archive. Unfortunately, the text has varying lengths, resulting in various heights. Of courses, you could manually adjust the length in every instance, but this takes time. And it is not very sustainable, because if you change the size, you’ll have to reformat the text again. Solve that by truncating your text:
- Go to the main component.
- Select the text box inside it, and access the type settings menu.
- At the bottom of the basics tab, activate truncate text.
- Set it max lines to your desired value.
Now, if your content exceeds the text box, it will be cut off with an ellipsis at the end of a word. This also is a neat trick when you’re doing UI Design and that deals with a fixed size for a certain component.
5. Relative line height
When it comes to larger headings, you should strive to make them more compact, especial when they spread across multiple lines. Otherwise the headings take up too much space and visually fall apart. A value that is a bit more than the font size is often appropriate. For instance, if your text size is 40 px, a good line height could be 44 px.
But what if you change the font sizes during the design process? Then you’ll have to manually adjust the line height again! Not so, if you type in a percentage value. This way it will always be relative to the font size.
Depending on the typeface and font size:
- For headings, between 105% and 115% will work.
- For body text, something around 140% to 150% often will be ideal.
But there is more to line-height. Learn about the ideal line length and line height in relation to each other.
4. OpenType Features
If you’re a subscriber to the Font Friday Newsletter, you know I looooooove OpenType features. They are like a typographic treasure chest, many people don’t even know about! So let’s dig it up by opening the Type settings and switching to details. Depending on your font, you will have more or less options here.
And old-style numbers aren’t bad per se – wow, that rhymes! In body text, they blend in nicely, and might be the thing you need. But again, it depends on the font, if these numbers are provided. The same goes for tabular figures, which are monospaced. You might need in a counter, so things don’t shift, learn more in my first article and video ever. Also, in my UI Fonts Checklist, the recommended fonts will be providing, if they are equipped with tabular figures.
3. Hanging Punctuations and Lists
When designing running text, you want to have a clean, sharp edge. But when you start with a quotation mark, this does not really work … until now, thanks to hanging punctuations:
- Access the Type settings.
- Switch to the Details tab.
- In the indentation section, activate Hanging punctuations.
Yes! Doesn’t it look so much sharper now? This also works with right aligned text, or using other quotation marks, like «Guillemets». But only at the beginning or end of a text, which is fine to me, since this is where it is most annoying.
When it comes to bullet points, you now can also make them hanging, by activating the hanging lists. This works with unordered and ordered list and makes them a bit more seamless. It will not always look appropriate for your project, try it out and decide if it fits.
2. Variable Fonts
Variable Fonts finally arrived in Figma in 2022, giving you the option to much better adjust the type to your design’s needs. This again depends on if the typeface is provided as a variable font. In Figma discover the possibilities in the Variable tab under the the type settings.
Most variable fonts come with a weight axis, like Rowan here. Georama additionally has a width axis, which is neat, for headings or longer text in labels in your UI design. But it can be much more, like with Recursive, that can seamlessly shift from monospace to proportional or become more casual. So many great options here!
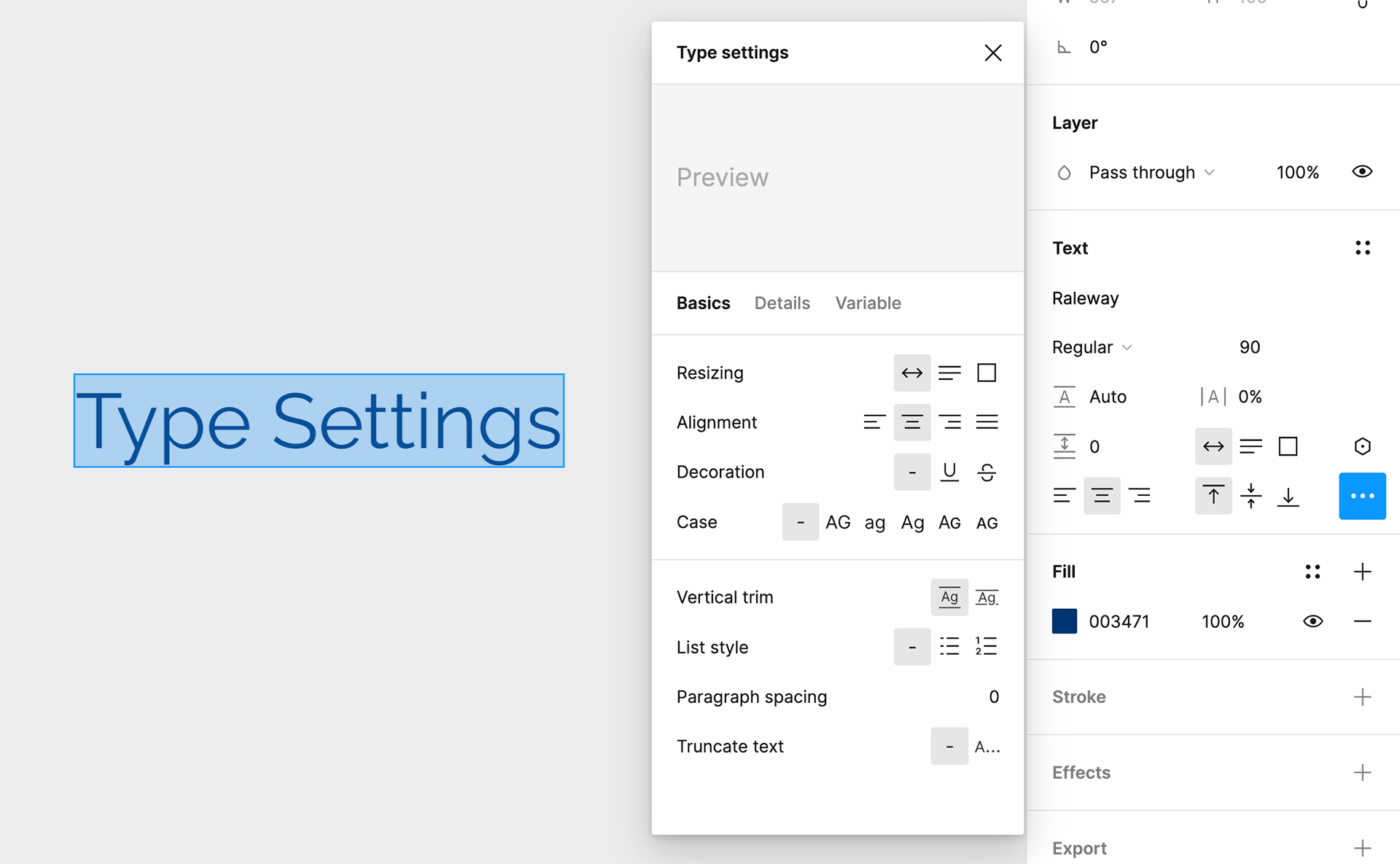
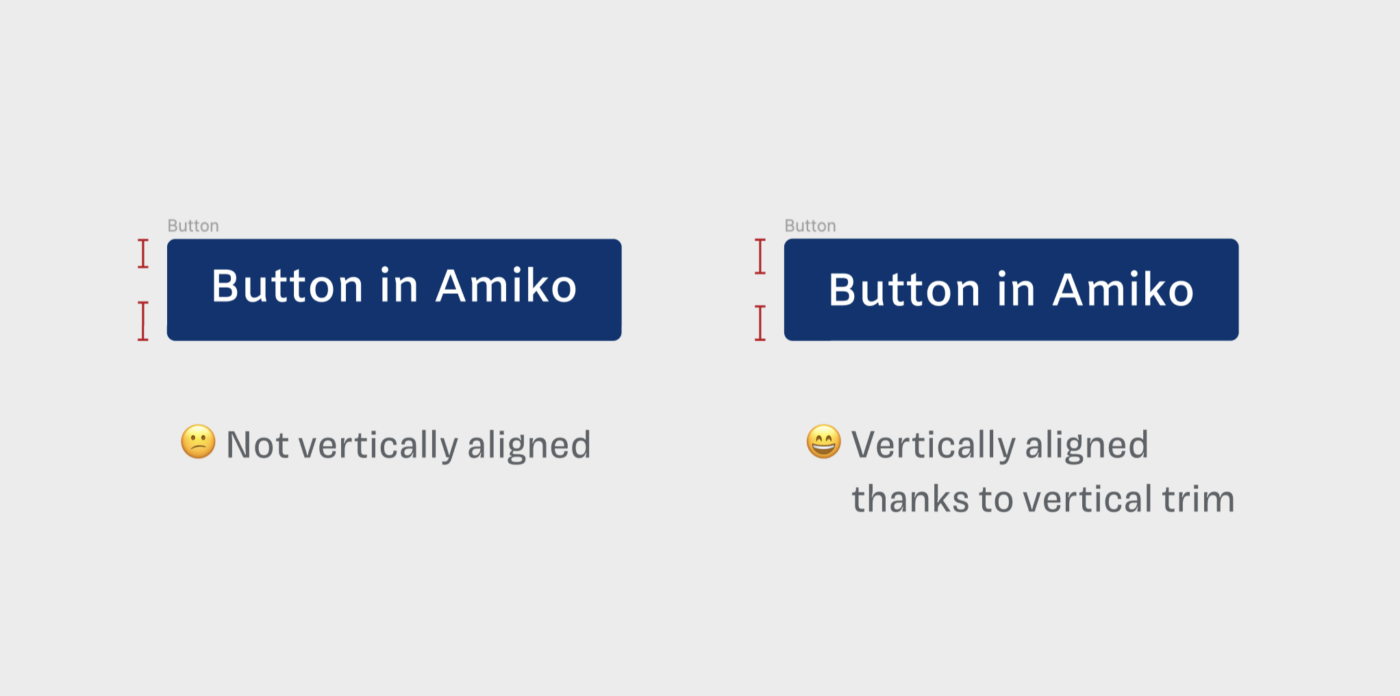
1. Leading trim or vertical trim
Many typefaces are not vertically centered. This is most annoying and striking when designing buttons. It leaves you no choice than manually adjusting it with different values for top and bottom padding. Additionally, fonts have varying vertical metrics, which means you’ll probably will have to adjust it again, when you change to another typeface 😱.
Solve that by activating leading trim in Figma:
- Select the text and go to the Type settings.
- Stay in the Basics tab.
- At vertical trim, turn on “Cap height to baseline”.
This clips the text between baseline and cap height, so you can add the same top and bottom space! It will also make changing typefaces much more seamless. Truly one of the best additions to Fimga lately.
So which one of these is your favorite hack? Tell me in the comments! Also, if you have a great Figma type trick to share.
Love this article! Especially excited to see variable weight fonts and leading trim. Figma is beating browser makers to the punch with the latter as leading-trim is only available in Safari Technical Preview for now (see https://caniuse.com/?search=leading-trim) but hopefully other browsers will adopt this property soon 🤞🏻
Absolutely, Bob. Somewhere you gotta start 😉.
Great article. Love how I can also share this with others, as I also repeat the mantra, typography is more of an art than science. So I don’t sound like the only one to say so.
*Small spelling correction required. Rime is frost, and rhyme is a literary device used for poetic structure.
Thank you, Paul! Just fixed it 😉.
I never knew that we can set max lines in Figma!!! All the tips here are amazing, thanks for sharing!
Yes, we can! Happy you enjoyed that tip ☺️!